Trade Manager 4 Pro - User Guide
Trading Panel
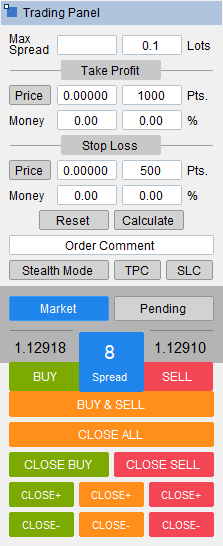
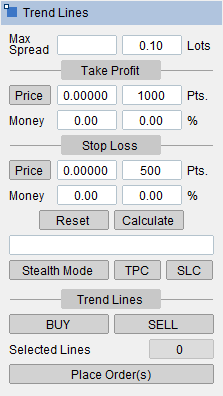
Max Spread - If the current spread on the market is higher than pre-set value then afer click to buttons Buy, Sell, Buy and Sell no order will be executed.
Lots - Lot size (or number of currency units) we want to buy or sell.
Take Profit - We can define Take Profit in Trade Manager on 4 different ways.

- Take Profit [price] - bassed on exactly defined price (for example: 1.25623 for GBPUSD)
- Take Profit [pips/points] - based on the distance from market price specified by Pips/Points (for example: 1000 points from the market price or from the entry price for pending order)
- Take Profit [money] - based on amount of money we expect as our profit (for example: 200 USD)
- Take Profit [%] - based on percentage of our account balance (for example: 2%)
Stop Loss - And the same way for Stop Loss.

- Stop Loss [price]
- Stop Loss [pips/points]
- Stop Loss [money] - based on amount of money we want to risk (for example: 100 USD)
- Stop Loss [%]
Calculate - When we have already set Lots, TP and SL and we click to Calculate button other parameters will be calculated. So we can see the risk and the profit from all perspectives. Calculated values are in readonly mode. And we can still rewrite pre-set values.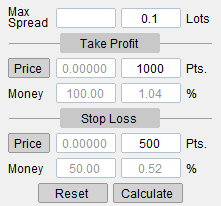
NOTE: When there is set too many values for the order, then we can see the following Warning: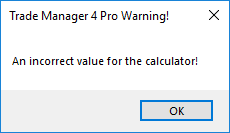
Reset - When we want to set different values for the order than we have already pre-set we have to click to the button Reset. It turn off calculated values from readonly mode and we can set new values. When we click to button Reset twice, then all values will be set to "zero".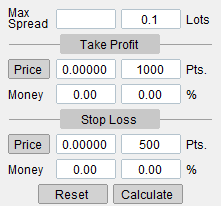
Order Comment - Here we can set any comment for new order(s).
Stealth Mode - When we open a new order then Take Profit and Stop Loss are set on broker side and visible for broker. When we want to hide our Take Profit or Stop Loss (for any reason) we can turn on Stealth Mode. Take Profit and Stop Loss will be not visible for broker, but our platform has to be still online because Trade Manager 4 Pro handle these levels. For that case is good to have VPS.
Stealth Mode provides next possible settings for the order like Take Profit on Close (TPC) and Stop Loss on Close (SLC) described bellow.
TPC - Take Profit on Close - We can set Take Profit level, but with active TPC, Take Profit will not close the order when the market price reach Take Profit level. If market continues in our direction and current candle will be closed, where Close price of this candle will be over our Take Profit level
SLC - Stop Loss on Close - The similar way it works for Stop Loss level. When SLC is active so order will be not closed on Stop Loss level but on Close price of current candle, but just in case that with Close price the loss is less than on Stop Loss level.
Market - By default Market panel is active in Trading Panel. This panel is for placing market orders.
Pending - When we want to place pending orders we have to click to Pending button and panel will be switched to Pending orders settings.
Buy - Place buy or long order
Sell - Place sell or short order
Buy & Sell - Place buy or long and sell or short order with one click.
Close All - Close all open orders.
Close Buy - Close only buy orders.
Close Sell - Close only sell orders.
Close+ (green) - Close only buy orders in the profit.
Close+ (orange) - Close all orders in the profit.
Close+ (red) - Close sell orders in the profit.
Close- (green) - Close only buy orders in the loss.
Close- (orange) - Close all orders in the loss.
Close- (red) - Close sell orders in the loss.
How to set basic order parameters
Trade Manager allows you to set up 65 different combinations of order settings for Lot, Take Profit and Stop Loss.
Fixed Lot size
REQUIRED: Set fixed Lot size to field with the label Lots: 
OPTIONAL:
For Take Profit set only one value from all 4 choices. If you don't want to set Take Profit make sure all value are set to zero.

- Take Profit [price]
- Take Profit [pips/points]
- Take Profit [money]
- Take Profit [%]
And the same way for Stop Loss set only one value from all 4 choices. If you don't want to set Stop Loss make sure all value are set to zero.

- Stop Loss [price]
- Stop Loss [pips/points]
- Stop Loss [money]
- Stop Loss [%]

Lot size calculation
REQUIRED: Set Lot size to field with the label Lots to "zero": 
Lot size can be calculated from Stop Loss settings. We have to set two values for calculation Lot size. One value from the first row and one value from the second row of Stop Loss settings. Here are only 4 possible combination how it is possible to do that:


We can set Take Profit value as well, but from Take Profit settings we can set only one value (Price, Pips/Points, Money or %)
Lot size can be calculated from Take Profit settings. It's not common but it is possible. We have to set two values for calculation Lot size. One value from the first row and one value from the second row of Take Profit settings. Here are only 4 possible combination how it is possible to do that:


We can set Take Profit value as well, but from Take Profit settings we can set only one value (Price, Pips/Points, Money or %)
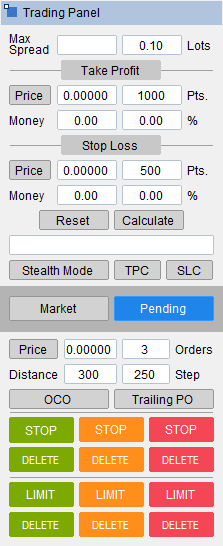
When we click the button Pending we can place Pending order. We have two choice how we can do that: 
Price - When we click the Price button so horizontal line will appear on the chart. We can move this line on the chart and set desired entry level for Pending order.
Distance - We can set the entry level for pending order by distance from the market price in pips/points.
Orders - How many pending order(s) we want to open at one click.
Step - What is the step between pending order(s) one from each other.
OCO - One Cancels the Other - If there are more pending orders so once first one will be hit all other pending order will be deleted.
Trailing PO - Trailing Pending order will follow the market price by pre-set Distance.
Stop (green) - Place Buy Stop order.
Stop (orange) - Place Buy Stop and Sell Stop order at one click.
Stop (red) - Place Sell Stop order.
Delete (green) - Delete Buy Stop order.
Delete (orange) - Delete Buy Stop and Sell Stop order at one click.
Delete (red) - Delete Sell Stop order.
Limit (green) - Place Buy Limit order.
Limit (orange) - Place Buy Limit and Sell Limit order at one click.
Limit (red) - Place Sell Limit order.
Delete (green) - Delete Buy Limit order.
Delete (orange) - Delete Buy Limit and Sell Limit order at one click.
Delete (red) - Delete Sell Limit order.
Trend Lines
We can place order(s) by Trend Line(s) with pre-set order's parameters. When we draw trend line on the chart and double click on this line (to have it selected) then Selected Lines on the panel will count the number of selected trend lines on the chart.
Now we can place Buy order or Sell order (or both) by click to Buy or Sell button (or both).
The entry level of pending order will change with each candle by trend line current value. When we click to Stealth Mode so these pending orders will be not visible for broker. Again for that case we need to have Trade Manager 4 Pro permanently online (for example on VPS).
When all is ready to place the order(s) we can click the button Place Order(s).
It is possible to use option OCO for these orders the same way like for other pending orders.
Trailing PO settings is not applied to trend line pending orders.
Stop Loss
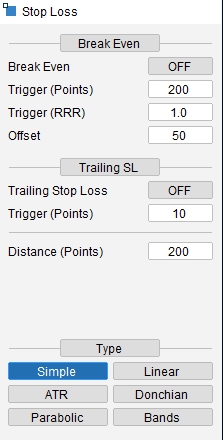
To protect our profit we can use additional settings for Stop Loss:
1. Break Even
ON/OFF - buttons are used to activate or deactivate Break Even.
The trigger has two setting options. You can set the distance in pips/points, and when the market reaches a profit at this distance, the Break Even is activated. It then moves the Stop Loss from the initial value to an offset distance from the entry value of the order.
Trigger (Points) - Distance in pips/points.
Trigger (RRR) - According to the Risk-Reward Ratio (RRR) that the order achieves, it is also possible to define the distance. The ratio is defined as the second number in the ratio. For example, 1:2 means that the Break Even is activated when the order reaches a distance twice as much as the initially set Stop Loss.
So, if the Stop Loss was set at 500 points, the Break Even would activate when the order is in profit by 2 * 500 = 1000 points.
If a value of 0.5 is entered for the RRR, then the RRR ratio is 1:0.5. In such a case, for a Stop Loss of 500 points, the Trailing Stop Loss would activate when the order is in profit by 0.5 * 500 = 250 points.
Offset - The offset is the distance from the entry value of the order where the Stop Loss will be placed.
2. Trailing Stop Loss
In the case where the order is in profit, and you want to eliminate risk by having the Stop Loss follow the price, you can use Trailing Stop Loss.
ON/OFF - buttons are used to activate or deactivate Trailing Stop Loss.
Trigger (Points) - Distance in pips/points.
For Trailing Stop Loss, there are several ways the Stop Loss can follow the price.
Simple: It follows the price at a fixed distance, for example, 500 points. Of course, if the market turns against you, the Stop Loss remains at its last highest value.
ATR, Donchian, Parabolic, Bollinger Bands: These settings are the same as parameters for the respective indicators. The Stop Loss moves exactly according to how these indicators are plotted based on the input values on the chart.
Triggers
Triggers are used to define what should happen in case an open order reaches the desired profit or loss.
There are three different types of Triggers:
1. Partial Close
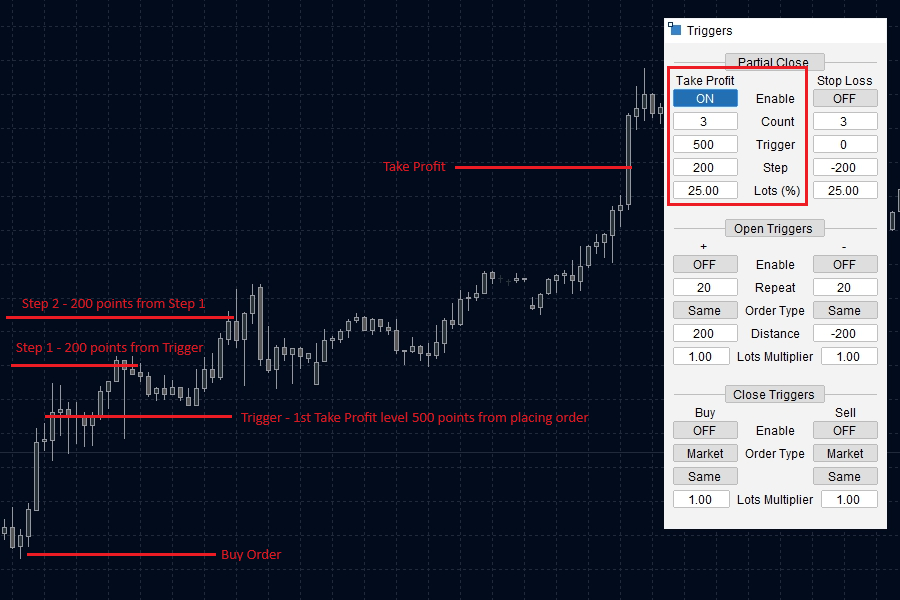
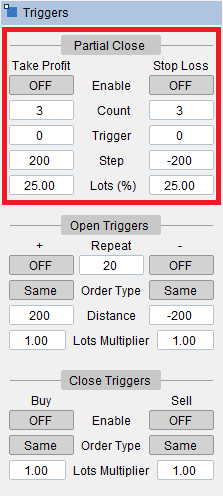
Partial Close is used to close a portion of a position when the profit or loss reaches a set level in points.
Here are the parameters that need to be set subsequently:
ON/OFF - buttons are used to activate or deactivate the trigger.
Count - means how many Take Profit or Stop Loss levels we want to set.
Trigger - is the distance in points for the first Take Profit or Stop Loss and here first partial closure of the order is executed.
Step - is the distance in points from the first trigger point, and this same distance is subsequently applied to each successive level for Take Profit or Stop Loss.
Lots (%) - it is possible to set what percentage of the order should be closed at each level.
The principle works the same for Take Profit and Stop Loss; the only difference is that for Stop Loss, it is necessary to enter negative values (since the position is going against us)
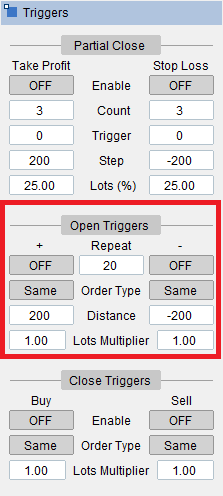
2. Open Triggers
They are called Open Triggers because they are activated when the order is active. However, the settings must be configured before the order is placed in the market. The goal of setting up Open Triggers is to configure semi-automatic trading, where you only input the parameters for managing the order when you feel that favorable conditions might occur in the market.
(+) represents settings for orders that are in profit and (-) are settings for the orders in loss.
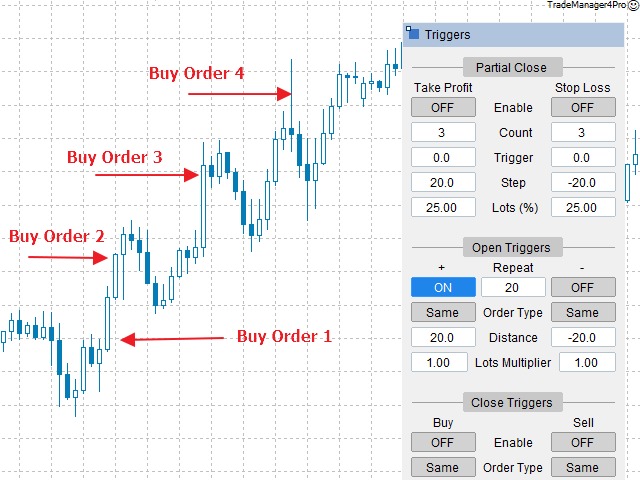
A. Pyramiding positions (+)
Pyramiding is adding to a position when the order is in profit. Parameters for pyramiding:
ON/OFF - buttons are used to activate or deactivate the trigger.
Order Type - When we set it to "Same," it means that at the specified distance from the entry or the last previous level, an order of the same type will be opened. If the first order was a "Buy," all subsequent orders will also be of the "Buy" type - this setting is pyramiding.
Distance - is the distance in points from which the next position should be opened.
Lots Multiplier - Typically, for pyramiding, a multiplier is used smaller than 1 for all subsequent orders. However, of course, this setting is up to you.
Repeat - means how many times the pyramiding should be repeated.
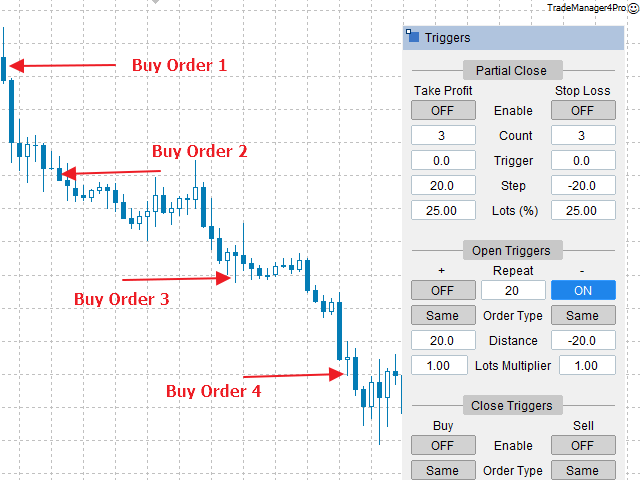
B. Averaging Down (-)
Averaging down, on the other hand, is adding to a losing position. The settings are completely the same as in pyramiding, only they occur in the column with "minus" sign.
C. Trading in range (+) (-)
If the market is moving within a range defined by some support and resistance, it is possible to set up Open Triggers for this scenario.
In this case, however, the opposite position may open before the previous one is closed. This could happen because the market may not precisely adhere to the levels of support and resistance. The previous order remains open until it closes on the set Take Profit or Stop Loss which can be wider than distance for opening reverse position. In the meantime, a new order in the opposite direction may open independently of the previous one. In this scenario, the trader can decide at which level to close the previous order manually.
Here are the differences in settings compared to pyramiding or averaging down:
Order Type - here we set "Reverse," it means that at the specified distance from the entry or the last previous level, an order with reverse type will be opened. If the first order was a "Buy," next order will be "Sell" and next order will be "Buy" and so on.
Distance - This distance must always be smaller than the distance defined for Take Profit or Stop Loss. This is because if it were larger, the order would reach its Take Profit or Stop Loss, and the Open Triggers would disappear along with the order being closed.
3. Close Triggers
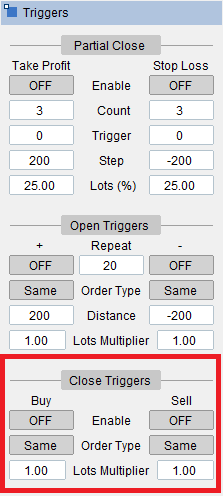
"Close Triggers," unlike "Open Triggers," are activated only when the previous order has been closed. And again, in the order type, you can define what type of order should be opened after the closure of the previous one. Here i
Here, the settings are a bit different, and the Close Trigger is configured separately for Buy and Sell orders.
ON/OFF - buttons are used to activate or deactivate the trigger.
Order Type - Here, there is an option to set whether it will be a Market Order or a Pending Order that is placed in the market when the order is closed. Similarly, it is necessary to specify whether it will be the same type, "Same," meaning Buy or Sell, or "Reverse," which is the opposite order.
Depending on whether the order ends in a profit or a loss, in the case of a pending order, it will be either a Stop or a Limit order.
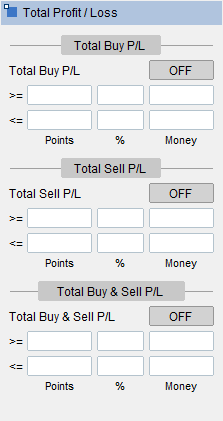
Total P/L (Profit/Loss)
When we have open a lot of position and we want to define Total Profit or Loss for all open positions we can set that in pips/points, % or money. All we need is just to enable it for Buy, Sell or Buy and Sell by clicking to On/Off button.
For example, we have 5 open orders and sum of the profit of all these position is currently 150 EUR. And now we want to close all open orders at the same time when sum of the profit of all open position will equal 200 EUR. So we enable the button for Buy and Sell and to the first row ">=" and the last column "Money" we set value 200.
On the chart appear the line indicated where is the price where all open positions will reach amount 200 EUR.
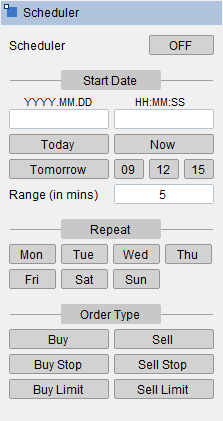
Scheduler
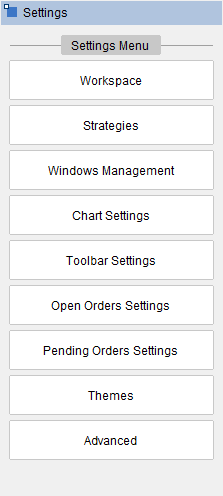
Settings
Trade Manager 4 Pro has a lot of settings and few next settings will be released soon.
Workspace
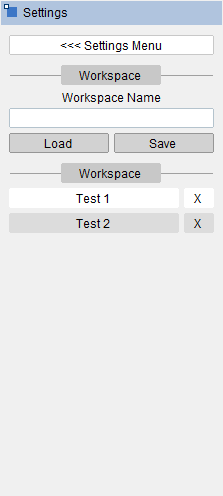
All our settings on Trade Manager 4 Pro we can save to the Workspace with custom name. It works very similar way like Templates in Meta Trader 4 and it can be combined with Templates as well.But in the next relase of Trade Manager 4 Pro will be that we can share Workspaces between different brokers on the same computer.
Workspace can store the positions of the windows/panels on the chart. What panels are hide or show. Theme of panels and so on.
Save workspace - To the field Workspace Name we can put the name of our Workspace and click the button Save. Workspace name will be displayed in the list of Workspaces below.
Load workspace - Click to one of Workspace name in the list of Workspaces. The name will be set in Workspace Name field and then click to Load and Workspace settings will be applied
Strategies
Exactly the same way like Workspaces works Strategies. But here are stored all pre-set values for our order or trading style: Lots, Take Profit, Stop Loss.. Everything else works like for Workspaces.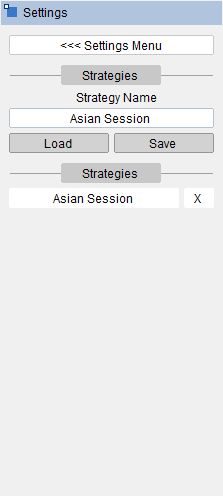
Windows Management
We can move windows/panels on the chart with catching the square at the top left corner of each panel or we can set X,Y coordinates of window here in Windows Management.We can write the numbers where coordinates 0,0 are at the top left corner of ther chart.
Here it is possible to set coordinates like numbers or wen can use following text commands for moving the windows.
For coordinates in X direction can be used following "left", "right", "center".
For coordinates in Y direction can be used following "top", "bottom", "center".
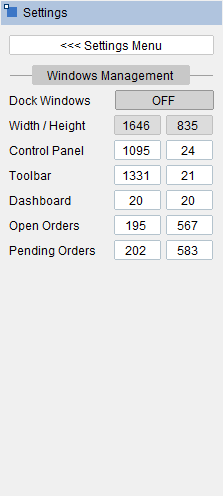
Chart Settings
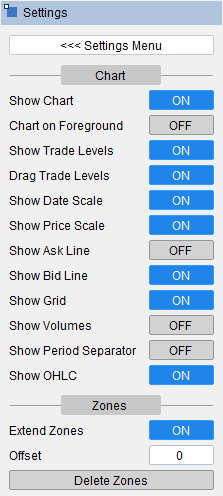
Here it is possible to set some settings regarding to the chart. Mostly are here all the Chart settings what we can set throug menu in Trade Manager. But here is little more settings.One of the interesting settings is Show Chart. If we like we can turn off chart (market price) and we can trade only by indicators attached to the chart. Other settings should be well known.
NOTE: Settings for Zones will be available in the nex release.
Toolbar Settings
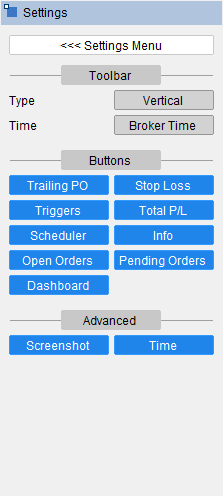
Toolbar is very important panel. We can hide or show panels or switch between them. In toolbar settings we can define what kind of buttons we would like to have always available. And it depends on the strategy we want to trade. For example if we are not using Triggers or Scheduler we can hide these buttons from the toolbar.Toolbar can be horizontal or vertical.
Open Orders Settings
Open Orders is table containing all Open Orders. Table Open Orders can be activated by button Open Orders on toolbar. By default there is only few columns, but it's possible to have customized Open Orders table with all needed columns.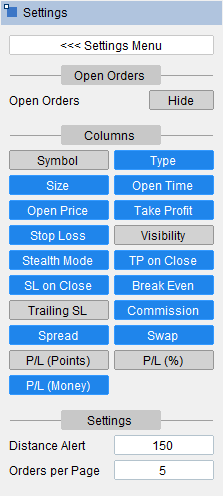

Pending Orders Settings
The same way ot works for Pending Orders table just columns are little different.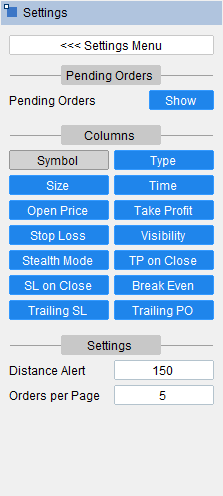

NOTE: Open and Pending orders table contains some shortcut buttons for orders.
Themes
Here we can choosed the theme what we like to have: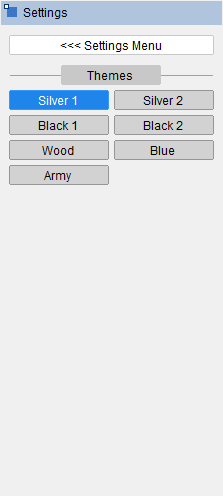
Advanced
Here are some additional settings. All of them should be clear, but one is quite special. It is scaling. We can get panels and fonts bigger or smaller. The value 100 means, that the current size of panels is set to 100% size. When we want to have bigger panels we can set to 120 (%). or when we want to have smaller panels we can set to 85%.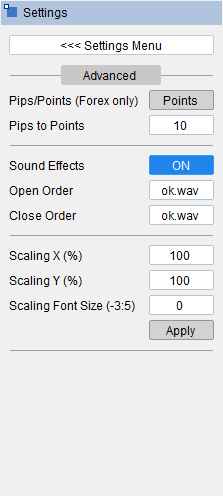
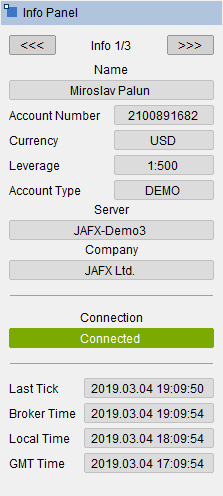
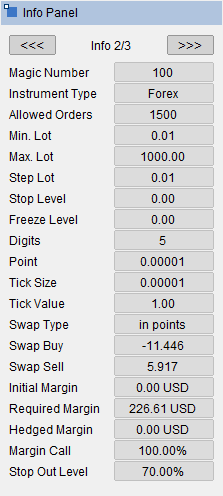
Info Panel
